I Kickstarted a card game and decided to use Amazon to handle my fulfillment. Why’d I do it? What problems did I run in to? Would it work for you?
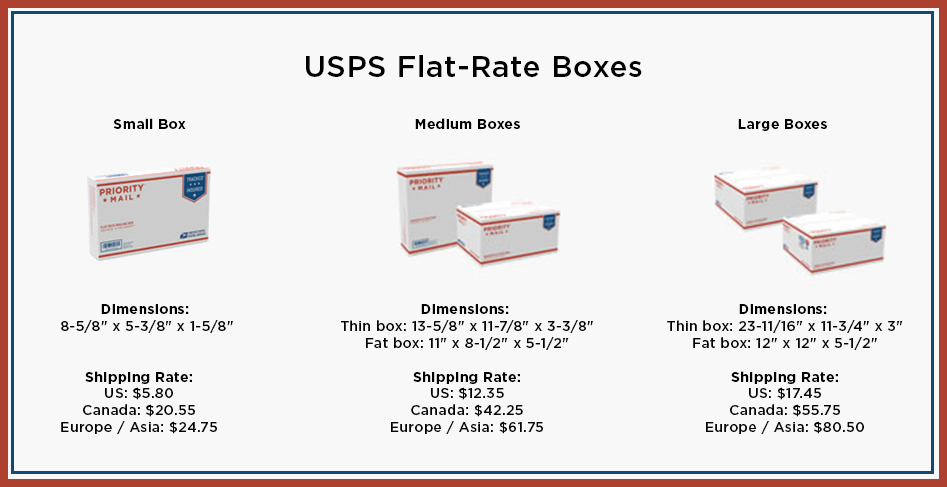
Part 2: Accurately Estimating the Shipping and Fulfillment Costs of Your Kickstarter Project
Part 3: Listing Your Item On Amazon
Part 4: Getting Your Product to an Amazon Warehouse
In this blog, I will help you create a shipment to deliver your Kickstarted products from the back door of your manufacturer to the front door of an Amazon warehouse.
You won’t need to use this blog until you can answer the following questions:
- Who is manufacturing your product?
- How many of your product are you making?
- Do you have contact with a polite and timely representative of the manufacturer to work out all of the details involved in setting up a huge shipment of your great stuff to Amazon?
Great! Sounds like you have had a successful Kickstarter campaign and your hard work is that much closer to paying off.
Prerequisites
Make sure you done the following:
- Set up an Amazon account and listed your item (covered in Part 1 of this blog).
- Listed your item on the Amazon store (covered in Part 3 of this blog).
Gather the following information from your timely and polite email contact:
- The shipped-from address for the manufacturer? (My manufacturer was AdMagic, which is an American company that uses offshore printing plants. They gave me the U.S. address of their HQ as their ship-from address)
- Will your item be packed and shipped as individual items or in cases? (Cases are the cardboard boxes that hold more than one of your item.)
- How many of your items will be in each case? (Each case will hold the same amount)

A small portion of my games in cardboard cases on a pallet in the back of my mom’s truck. Aren’t moms the best?
Note: This blog is written with the assumption that your manufacturer already knows how to send stuff to Amazon – the majority of them do. This means that while you still have work to do and information to gather, the manufacturer has experience packing, boxing, stacking, wrapping and labelling pallets in accordance to Amazon’s wishes.
Before We Start -Changing a Shipment Setting
Amazon would prefer that you ship your items to three different Amazon warehouses. This makes sense as they can ship your item from the warehouse located closest to its destination.
However, shipping your products to three warehouses… (hold on, I’m doing some rough estimations)… TRIPLES THE PRICE OF SHIPPING.
You can change this, though. It’s called your Inventory Placement Option.
The default, ship-to-three-warehouses setting is the Distributed Inventory Placement option and the ship-to-one-warehouse Inventory Placement Service option.
Here’s a screenshot from the deepest pits of Amazon’s Seller Help Pages instructing you on how to update this option.
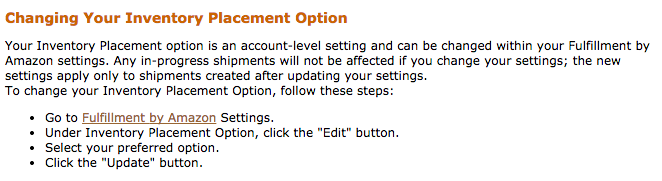
Click the image to be directed to the link in the screenshot.
As you may have expected, doing this isn’t necessarily free. Let me tell you all I know and have experienced about updating this setting.
Changing your Inventory Placement Option
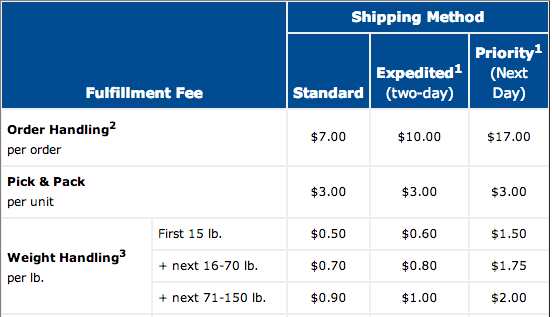
When you change your Inventory Placement Option from Distributed Inventory Placement to Inventory Placement Service, you should be given a warning about how much this will cost you. Here’s a screenshot of the fees:

Fees associated with sending your products to only one Amazon warehouse
Quick Calculation Time

Calculations at the bottom. I used 40 cents as my per-unit fee, but yours may different. Read more below.
My game weighs 2 pounds and I shipped 1500 games from my manufacturer to Amazon. This puts my Inventory Placement Fee at $600.00.
I don’t know the actual cost of my shipping as it was worked into my per-unit cost by my manufacturer, but I was informed that shipping the units to two additional warehouses was going to cost much more than $600. Considering my games originated offshore, and each shipment would have been 1000 lbs (500 games at 2 lbs each); I had no reason to disagree.
Off the record
For the love of blue skies and pink sunsets, don’t sue me over this, but it is possible that you may not get charged this fee – at least not immediately and not the full cost. Here is my own anecdotal experience mixed with others that I have asked about this subject.
I have still not been charged this fee. I keep waiting for it, but it hasn’t shown up. Another game designer I talked to said that they were charged months after, but not for the complete set of items. He was only charged this fee for the items that were relocated to a new warehouse.
My guess is that Amazon takes note of where your items are being shipped to most often. If your original warehouse is in Atlanta, but your product becomes a hit in LA, I would expect Amazon to ship a set of games to a warehouse on the west coast. At that point, you would be charged the above fees for the items shipped to the new location.
Alright, back to creating your shipment.
Your First Replenish Inventory Order
Let me direct you for a second to the Inventory page. I will do my best to cover any differences between the Old Inventory View and the New Inventory View.
- Go to the Amazon Seller homepage
- Click on Inventory at the top of the page
- Your item should already be listed (if not, go to Part 3 of this blog)
- Select the check box on the left hand side of your item
- Old View – Above the list of products select the Actions drop-down button
- New View – Above the list to the left select the Action on 1 item drop-down button.
- Select send/replenish inventory.
You should have now been taken to a screen with this box at the top (note that I already added an address, but yours will be blank):

You are creating a new shipping plan, of course. Add the ship-from address of your manufacturer that you gathered earlier. Change Packing Type to the correct option. It will almost undoubtedly be Case-packed products. When finished, click on the Continue to Shipping Plan button.

In the Set Quantity step, enter the number of cases you will be sending Amazon and how many of your item will be in each case.

For my shipment, one case held eight games. Can you guess how excited you will be when you open your first case? You might cry.

I don’t know too much about fees for Prepping Products because mine didn’t need any prep. I doubt you will either, unless you have something fragile or oversized. Click Here to read more about it on the Amazon Help Pages.

If your products do not have a UPC symbol, you will need Amazon or your manufacturer to label them for you. (i.e. affix a sticker on your product with your UPC symbol). If at all possible, get your UPC on your item instead of dealing with this. I wrote a Quick UPC guide that can help guide you with this.

Double check your ship-from address, cases, units per case, total units, and packing type. Contents should be 1 MSKU, which is your 1 product.
If you successfully changed your Inventory Placement Option to Inventory Placement Service, you should see only one Amazon warehouse under Ship To. For now, it is just a code, city and state (for example CHA1, Chattanooga, TN).
Now you can approve the shipment and get started on the next part. After you d0, you’ll notice that Review Shipments has updated to View Shipments in the progress bar above.

Your shipment has now been saved and you can return to it later. Let’s continue, though. Click on the Work On Shipment button to the right.

From here, you can start gathering information your manufacturer needs:
- Shipping Address of the Amazon Warehouse
- Amazon Reference ID – Right now it is probably blank, but it will populate in the next couple of hours.
- ID – Your manufacturer will ask for the shipment’s Bill of Lading. However, you aren’t officially given this until you select Complete Shipment. However, the Bill of Lading will match the ID shown here.

Above, my selections are shown, though yours may be different. I needed to ship around 1500 games to Amazon which – according to my manufacturer – was about 3 pallets worth, which is less than a truckload (LTL). SPD would be if you hand-mailed a few items to the Amazon Warehouse from your post office.
I chose Other as my manufacturer did not use one of the carriers listed. I don’t know much about shipping with an Amazon-Partnered Carrier, so if you do, feel free to talk about it in the comments and I can update this post.

As you will not be packing these labels yourself, your manufacturer will ask you to send a PDF file of the box and pallet labels to your manufacturer. Select Print, then save as a PDF, and send away.
All Done! After completing the shipment order and communicating all of the necessary details to your manufacturer – which may take a few days – hit the Complete Shipment button.
Did I miss anything? I wrote this blog from my own research and first-hand experience, but I’m not perfect. Please let me know if you have any questions and/or suggestions for updates I should add to this blog.
What’s next?
Waiting. Lots of it. Especially if your item is being produced overseas. Eventually your items will arrive at Amazon.
Keep an eye on the shipping progress and a couple of weeks before your items arrive, send out your backer survey to get everyone’s address.
Once your items are at the Amazon warehouse and you have everyone’s address, there’s only one thing left to do – ship ’em out.
Last Words
I thought 4 parts would be enough to complete this set of blogs, but it looks like I’ll need one more. Next will be Part 5: Completing Kickstarter Fulfillment using Amazon Multi-Channel Fulfillment.
You can follow my gaming twitter @WhatOhGame if you are so inclined.